A dark garage is more than just an inconvenience — it’s a safety hazard, a productivity killer, and a wasted opportunity. Whether you’re doing car maintenance, woodworking, organizing your storage, or converting your garage into a gym, proper lighting is the single most impactful upgrade you can make.
In this complete garage lighting guide, we’ll cover everything: types of lights, how many lumens you need, installation tips, lighting layouts, and the best products for 2026. By the end, you’ll know exactly how to transform your garage from a dim, frustrating cave into a bright, functional, professional-grade space.
Why Garage Lighting Matters More Than You Think
Most garages rely on one or two bare bulbs installed by builders — the minimum required by code. These fixtures typically produce 800–1,600 lumens total. A typical garage needs 5,000 to 20,000+ lumens depending on size and use. That gap is enormous.
Poor lighting leads to:
- Safety risks — missed spills, tripping hazards, and hard-to-see obstacles
- Eye strain — squinting while working on small parts or reading labels
- Missed details — overlooking vehicle damage, measuring errors in DIY projects
- Poor use of space — dark corners become dumping zones
Good lighting, on the other hand, makes your garage feel like a professional workspace. It also increases your home’s value — a well-lit, well-organized garage is a significant selling point.
How Many Lumens Does a Garage Need?
Before choosing lights, you need to understand lumens — the measure of light output.
General rule: Aim for 50 lumens per square foot for general use, and 75–100 lumens per square foot for workshops or detailed work.
| Garage Size | General Use (50 lm/sq ft) | Workshop (75–100 lm/sq ft) |
|---|---|---|
| 1-car (200 sq ft) | 10,000 lumens | 15,000–20,000 lumens |
| 2-car (400 sq ft) | 20,000 lumens | 30,000–40,000 lumens |
| 3-car (600 sq ft) | 30,000 lumens | 45,000–60,000 lumens |
Color temperature also matters. For garages, choose lights in the 5,000K–6,500K range (daylight/cool white). This mimics natural sunlight, reduces eye strain, and makes colors appear accurate — essential when matching paint on a car or working with stain on wood.
Types of Garage Lights: Which Is Right for You?
1. LED Shop Lights (Linkable Strips)
Best for: Workshops, workbenches, budget setups
LED shop lights are long rectangular fixtures — typically 4 feet — that hang from chains or mount flush to the ceiling. Many models are “linkable,” meaning you can daisy-chain multiple units together with a single plug.
Pros:
- Very affordable (often $20–$40 per unit)
- Easy to install — no wiring required for plug-in models
- Linkable for full coverage
- Produces even, shadow-free light
Cons:
- Lower total lumens per fixture than high-bays
- Hanging chains can look utilitarian
Top pick for 2026: Look for linkable LED shop lights with 5,000 lumens per fixture, 5000K color temperature, and a built-in pull-chain switch.
2. LED High-Bay Lights
Best for: High ceilings (10+ feet), large garages, maximum brightness
High-bay lights are round or UFO-shaped LED fixtures designed for industrial spaces. They produce massive amounts of light — often 15,000–30,000 lumens per fixture.
Pros:
- Extremely high output
- Energy efficient
- Long lifespan (50,000+ hours)
- Professional appearance
Cons:
- Higher upfront cost ($40–$100+ per fixture)
- Requires hardwiring or a plug adapter
- Overkill for low ceilings
Ceiling height guide:
- 8–12 ft ceiling: 100W equivalent high-bay
- 12–20 ft ceiling: 150–200W equivalent
If you’ve already followed our guide on how to convert your garage into a home gym, high-bay lights are ideal for lighting that kind of open, active space.
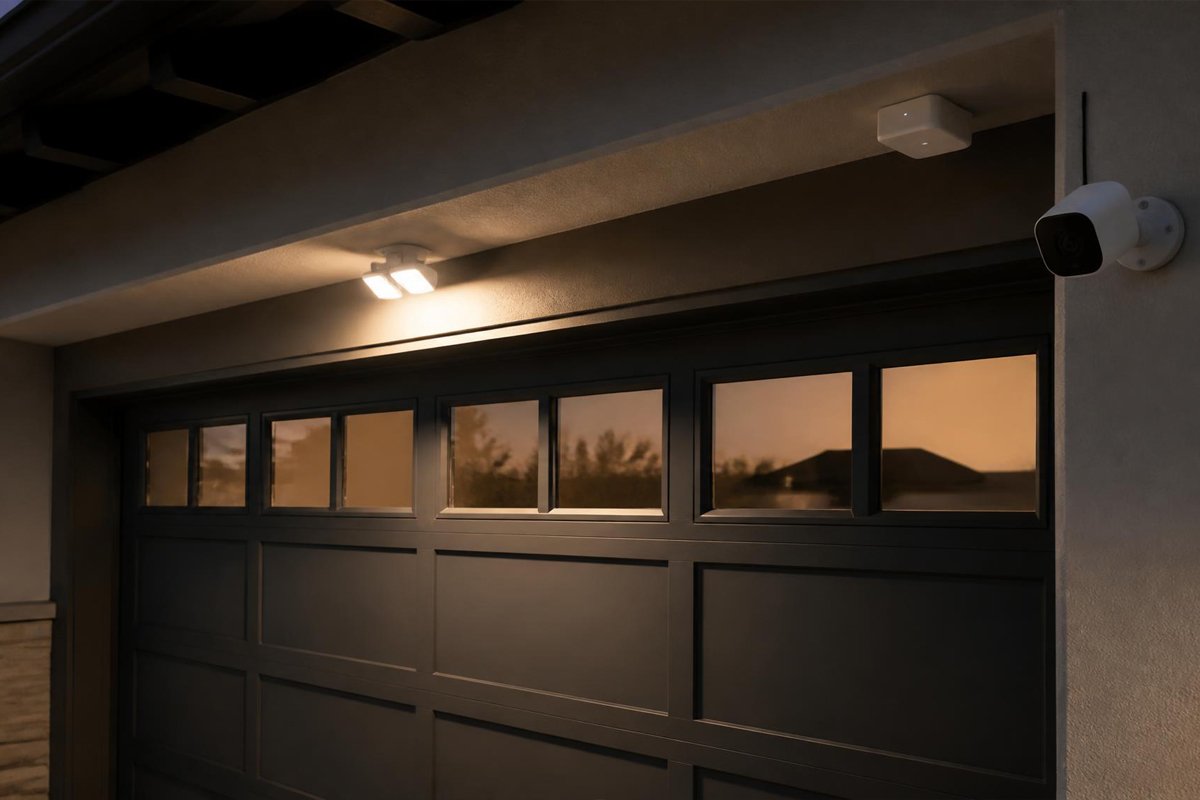
3. Motion-Activated Garage Lights
Best for: Entry areas, safety lighting, energy saving
Motion-activated lights turn on automatically when you enter the garage. They’re great for areas where you don’t spend long periods — near the entry door, above the main garage door, or in a storage corner.
Pros:
- Energy-saving (only on when needed)
- Convenient — no fumbling for switches
- Great for safety
Cons:
- Not ideal as primary work lighting
- Can turn off mid-task if you’re standing still
Look for models with adjustable sensitivity and time-out settings (30 seconds to 10 minutes).
4. Ceiling-Mounted LED Panels
Best for: Finished garages, home gyms, living spaces
If you’ve invested in epoxy coating your garage floor and built a clean, finished space, flat LED panel lights give a polished, residential look rather than a workshop appearance.
Pros:
- Clean, modern aesthetic
- Even light distribution
- Great for finished spaces
Cons:
- More expensive
- Requires hardwiring
- Lower output than high-bays
5. Portable Work Lights & Task Lights
Best for: Under-car work, detailed tasks, supplementary lighting
Even with great overhead lighting, there are always dark spots — under a car, inside a cabinet, in a deep toolbox drawer. Portable LED work lights fill these gaps.
Options include:
- Tripod-mounted shop lights — freestanding, adjustable height
- Magnetic work lights — attach to car chassis during repairs
- Underhood lights — flexible strips that hook over the hood
These are essential if you do any car maintenance. When combined with our car maintenance checklist for 2026, a good portable work light ensures you never miss a detail under the hood.
6. Garage Door Opener Lights
Your garage door opener already has a built-in light — but the stock bulb is usually weak (60W equivalent or less). Upgrade it to a 100W-equivalent LED bulb for significantly more light near the main entry point.
Important note: Not all LED bulbs are compatible with garage door openers. Look specifically for LED bulbs rated for garage door openers — some LED bulbs interfere with the opener’s radio frequency. Check your opener’s manual for compatibility.
If you’re due for an opener upgrade anyway, check our guide on garage door safety — modern openers include better built-in lighting as standard.
Garage Lighting Layout: How to Plan Your Setup
A great lighting plan eliminates shadows and ensures every corner of your garage gets adequate coverage. Here’s how to plan it:
Step 1: Measure Your Garage
Get the exact dimensions — length × width. This gives you your square footage and total lumens needed.
Step 2: Identify Your Zones
Most garages have 3–4 functional zones:
- Parking zone — where the car sits
- Workbench zone — where you do repairs, DIY, or hobbies
- Storage zone — shelves, cabinets, overhead storage
- Entry zone — door from house, side door
Each zone may need different lighting. The workbench zone needs the most light. The parking zone needs general overhead coverage. Storage zones benefit from motion-activated lights.
Step 3: Plan Fixture Placement
For LED shop lights on an 8-foot ceiling in a standard 2-car garage (20 × 20 ft):
- Run 3 rows of lights, each with 2 × 4-ft fixtures
- Space rows 6–7 feet apart
- Offset fixtures to reduce shadows
For high-bay lights on a 12-foot ceiling:
- A 400 sq ft garage typically needs 4 × 15,000 lumen fixtures
- Position in a grid pattern (e.g., 2 × 2 grid for a square garage)
Step 4: Plan Your Wiring
If adding hardwired fixtures, plan the circuit load. A standard 15-amp circuit can handle approximately 1,800 watts. LED lights are so efficient that a full garage lighting setup rarely exceeds 400–600 watts — well within a single circuit.
If you’re not comfortable with electrical work, hire a licensed electrician for the wiring. Plug-in LED shop lights require no wiring at all — just hang and plug in.
How to Install LED Shop Lights (Step-by-Step)
This section covers the most common DIY installation: plug-in linkable LED shop lights.
Tools & Materials Needed
- LED shop lights (linkable)
- Tape measure
- Pencil
- Drill and drill bits
- Screws or toggle bolts (if ceiling isn’t drywall over studs)
- Stud finder
- Extension cord or power strip (if needed)
- Safety glasses
Step 1: Plan Your Layout
Measure the ceiling and mark fixture positions with a pencil. For a 2-car garage, plan 4–6 fixtures in 2–3 rows.
Step 2: Find Your Joists
Use a stud finder to locate ceiling joists. Mounting into joists is strongest. If your garage has drywall over concrete (common in finished garages), use appropriate toggle bolts.
Step 3: Mount the Fixtures
Most shop lights come with mounting hardware — chains, hanging brackets, or direct-mount screws. For flush-mount installation:
- Hold the fixture against the ceiling at your marked position
- Mark the screw holes
- Drill pilot holes
- Drive screws into joists or use toggle bolts for drywall
For hanging installation:
- Install screw hooks into joists
- Attach chains to the fixture and to the hooks
- Adjust chain length to desired height
Step 4: Link the Fixtures
Linkable shop lights have power-out ports on the end. Use the included linking cables to connect fixtures in a chain. Most systems allow 4–8 fixtures per chain.
Step 5: Connect to Power
Run the power cord from the first fixture to the nearest outlet. If the outlet is too far, use a 14-gauge extension cord rated for the wattage of your lights.
Step 6: Test and Adjust
Turn on the lights and check coverage. Walk through your garage and identify any dark spots. Add fixtures or reposition as needed.
Energy Efficiency: LED vs. Fluorescent vs. CFL
Many older garages still have fluorescent tube lights or CFL bulbs. Here’s how they compare to modern LEDs:
| Type | Lumens per Watt | Lifespan | Contains Mercury | Best For |
|---|---|---|---|---|
| Incandescent | 10–15 lm/W | 1,000 hrs | No | Nothing — replace immediately |
| CFL | 50–70 lm/W | 8,000 hrs | Yes | Already phased out |
| Fluorescent (T8) | 80–100 lm/W | 20,000 hrs | Yes | Being replaced by LED |
| LED | 100–200 lm/W | 50,000+ hrs | No | Everything |
Bottom line: LED lights use 50–75% less energy than fluorescent tubes and last 2–3x longer. For a 2-car garage running lights 4 hours a day, switching to LED from fluorescent saves roughly $40–$80 per year in electricity — and you avoid mercury disposal issues.
Smart Garage Lighting: The 2026 Upgrade
Smart lighting is no longer just for living rooms. In 2026, smart garage lighting options have become affordable and genuinely useful.
If you’ve read our smart garage technology guide, you already know how connected devices can transform your garage. Smart lighting is one of the easiest upgrades:
Smart Bulbs
Replace existing bulbs with smart LED bulbs (e.g., compatible with Google Home, Amazon Alexa, or Apple HomeKit). Control brightness and on/off via app or voice.
Cost: $10–$20 per bulb
Smart Switches & Plugs
Replace a standard switch with a smart switch, or plug shop lights into a smart plug. This works with any existing lights — no bulb replacement needed.
Best use: Set schedules (lights turn on at sunset, off at 11pm), create automations (lights turn on when garage door opens).
Motion-Sensor Integration
Pair smart lights with motion sensors so lights come on automatically whenever someone enters the garage. Great for safety and energy saving.
Integration with Garage Door Openers
Many modern smart garage door openers (like those covered in our smart garage guide) can trigger lights automatically when the door opens. This is especially useful when arriving home at night.
Lighting Ideas for Specific Garage Types
Workshop Garage
Priority: Maximum brightness, task lighting at workbench
Setup:
- High-bay or high-output LED shop lights overhead (target 75–100 lm/sq ft)
- Dedicated under-cabinet LED strip lights at the workbench
- Portable tripod work light for mobile tasks
If you’ve set up a garage workshop following our complete workshop setup guide, pair it with at least 40,000 lumens for a 2-car garage workshop.
Home Gym Garage
Priority: Bright, energizing light with even coverage
Setup:
- High-bay LEDs at 5000K–6500K (energizing, daylight color)
- No shadows in the exercise area
- Optional: smart lighting with color-changing capability for motivation
We covered the full conversion process in our garage home gym guide — lighting is one of the most impactful upgrades for workout spaces.
Storage Garage
Priority: Visibility in all corners, energy efficiency
Setup:
- General overhead LED shop lights
- Motion-activated lights in deep storage corners
- Under-shelf LED strips for cabinet interiors
Pair good lighting with smart organization — see our garage organization guide and small space storage solutions for the full transformation.
Standard Parking Garage
Priority: Safety, sufficient brightness for car entry/exit, convenience
Setup:
- 2–4 LED shop lights or high-bays for overhead coverage
- Motion sensor near entry door
- Upgraded bulb in garage door opener
Garage Lighting Safety Tips
Good lighting is also a safety issue. Keep these points in mind:
- Never exceed circuit capacity — calculate your total wattage before adding fixtures. A 15-amp, 120V circuit maxes at 1,800 watts (though best practice is to stay under 1,440 watts / 80% capacity).
- Use fixtures rated for garages — garages experience temperature swings, moisture, and dust. Choose fixtures with an IP54 or higher rating for damp locations if your garage isn’t climate-controlled.
- Keep flammable materials away from fixtures — even LED lights generate some heat. Don’t store gasoline, paint thinner, or other flammables directly beneath light fixtures.
- Label your circuit breaker — make sure you know which breaker controls your garage circuit. This is essential for safe electrical work.
- Use proper extension cords — never use thin household extension cords for shop lights. Use 14-gauge or 12-gauge cords rated for the wattage of your fixtures.
For more on overall garage safety, including fire prevention and garage door safety, see our garage door safety guide.
Garage Lighting Cost Breakdown
Here’s what a realistic garage lighting upgrade costs in 2026:
| Setup | Fixtures | Approx. Cost |
|---|---|---|
| Basic 1-car (2 LED shop lights) | 2 × 5,000 lm linkable | $40–$80 |
| Standard 2-car (4 LED shop lights) | 4 × 5,000 lm linkable | $80–$160 |
| Workshop 2-car (4 high-bays) | 4 × 15,000 lm UFO | $160–$300 |
| Smart 2-car setup (shop lights + smart plugs) | 4 lights + 2 smart plugs | $130–$220 |
| Full pro setup (high-bays + task lights + smart) | Mixed | $300–$600 |
Electrical work (if needed): $100–$300 for a licensed electrician to add or upgrade a circuit.
All costs can be significantly reduced by doing the installation yourself, especially with plug-in shop lights that require zero electrical work.
Quick-Start Checklist: Upgrading Your Garage Lighting
Use this checklist before you buy anything:
- Measure your garage square footage
- Calculate total lumens needed (50–100 lm/sq ft)
- Identify your garage zones (parking, workbench, storage, entry)
- Decide on fixture type (shop lights, high-bay, panel, or mixed)
- Check ceiling height for fixture type compatibility
- Plan fixture layout and count
- Assess electrical situation (plug-in vs. hardwired)
- Choose color temperature (5000K–6500K recommended)
- Consider smart controls if you want automation
- Add task lighting for workbench or specific zones
Frequently Asked Questions
Q: What is the best color temperature for a garage? A: 5000K to 6500K (daylight white) is ideal. It provides clear, accurate color rendering and reduces eye strain during detailed work.
Q: How many LED shop lights do I need for a 2-car garage? A: For general use, 4 × 5,000-lumen LED shop lights (20,000 lumens total) is a solid starting point. For a workshop, aim for 6–8 fixtures or switch to high-bay lights.
Q: Can I install LED shop lights myself? A: Yes — plug-in linkable shop lights are one of the easiest DIY upgrades. No wiring needed. Hardwired fixtures require basic electrical knowledge or a licensed electrician.
Q: Will LED garage lights work in cold temperatures? A: Most quality LED lights work in temperatures down to -20°F (-29°C). Always check the manufacturer’s specifications for the operating temperature range.
Q: Do LED lights interfere with garage door openers? A: Some LED bulbs emit radio frequency interference that can affect opener range. Use LED bulbs specifically labeled as compatible with garage door openers, or use incandescent bulbs in the opener itself and LEDs for all other fixtures.
Q: How long do LED garage lights last? A: Quality LED fixtures are rated for 50,000 hours or more. At 4 hours per day, that’s over 34 years of use before the light depreciates to 70% of original output.
Final Thoughts
Garage lighting is one of the highest-ROI upgrades you can make. For $80–$300, you can completely transform your garage from a dim, frustrating space into a bright, functional environment. LED technology in 2026 makes this easier, cheaper, and more energy-efficient than ever.
Start with the basics — calculate your lumens, choose your fixture type, and get the overhead coverage right. Then layer in task lighting and smart controls to match your specific use case.
Whether you’re maintaining your car to keep it running for 300,000 miles, running a workshop, or just trying to keep your garage organized, great lighting makes everything easier, safer, and more enjoyable.
Ready to tackle the next upgrade? Check out our garage insulation guide to keep your newly lit space comfortable year-round.
Published by GarageDaily.com — Your Ultimate Guide to Garage Solutions & Maintenance