By Danial Marquez | Repair | Updated June 2026
A broken garage door spring is one of the most common — and most misunderstood — garage repairs a homeowner will face. One moment your garage door opens and closes smoothly. The next, you hear a loud bang from the garage, and suddenly the door feels impossibly heavy, refuses to open more than a few inches, or slams shut unexpectedly. In almost every case, the culprit is a broken or worn-out spring.
Garage door spring replacement is also, without question, one of the most dangerous DIY repairs in the entire home improvement world. These springs are wound under extreme tension — enough to lift a 150 to 400 pound door — and that stored energy has seriously injured and even killed inexperienced DIYers who underestimated the forces involved.
This guide will walk you through everything you need to know: how to identify which type of spring your door uses, how to recognize the warning signs of failure, the real cost differences between DIY and professional replacement, the step-by-step process for those who are properly equipped and trained to do it themselves, and — most importantly — how to know when this is a job you should leave to a professional.
Why Garage Door Springs Matter So Much
Your garage door is likely the heaviest moving object in your entire home — a standard double garage door weighs between 130 and 400 pounds depending on material and insulation. Without springs, simply lifting that door by hand would be nearly impossible for most people.
Garage door springs counterbalance this weight, storing mechanical energy when the door is closed and releasing that energy to assist lifting when the door opens. This is why a properly functioning garage door feels almost weightless to open by hand, even though the door itself is extremely heavy. It is also why a broken spring transforms that same door into something that feels like solid concrete — the counterbalancing force is gone, and your garage door opener motor was never designed to lift that weight alone.
Understanding spring function also connects to the broader mechanics of your garage door system. If you have recently upgraded your opener, our guide on the best garage door openers and installation tips explains how openers and springs work together — and why a failing spring can actually burn out a perfectly good opener motor by forcing it to do work it was never designed for.
Types of Garage Door Springs
Before attempting any repair, you need to correctly identify which type of spring system your garage door uses. The two systems are mechanically very different, require different tools, and carry different levels of risk.
Torsion Springs
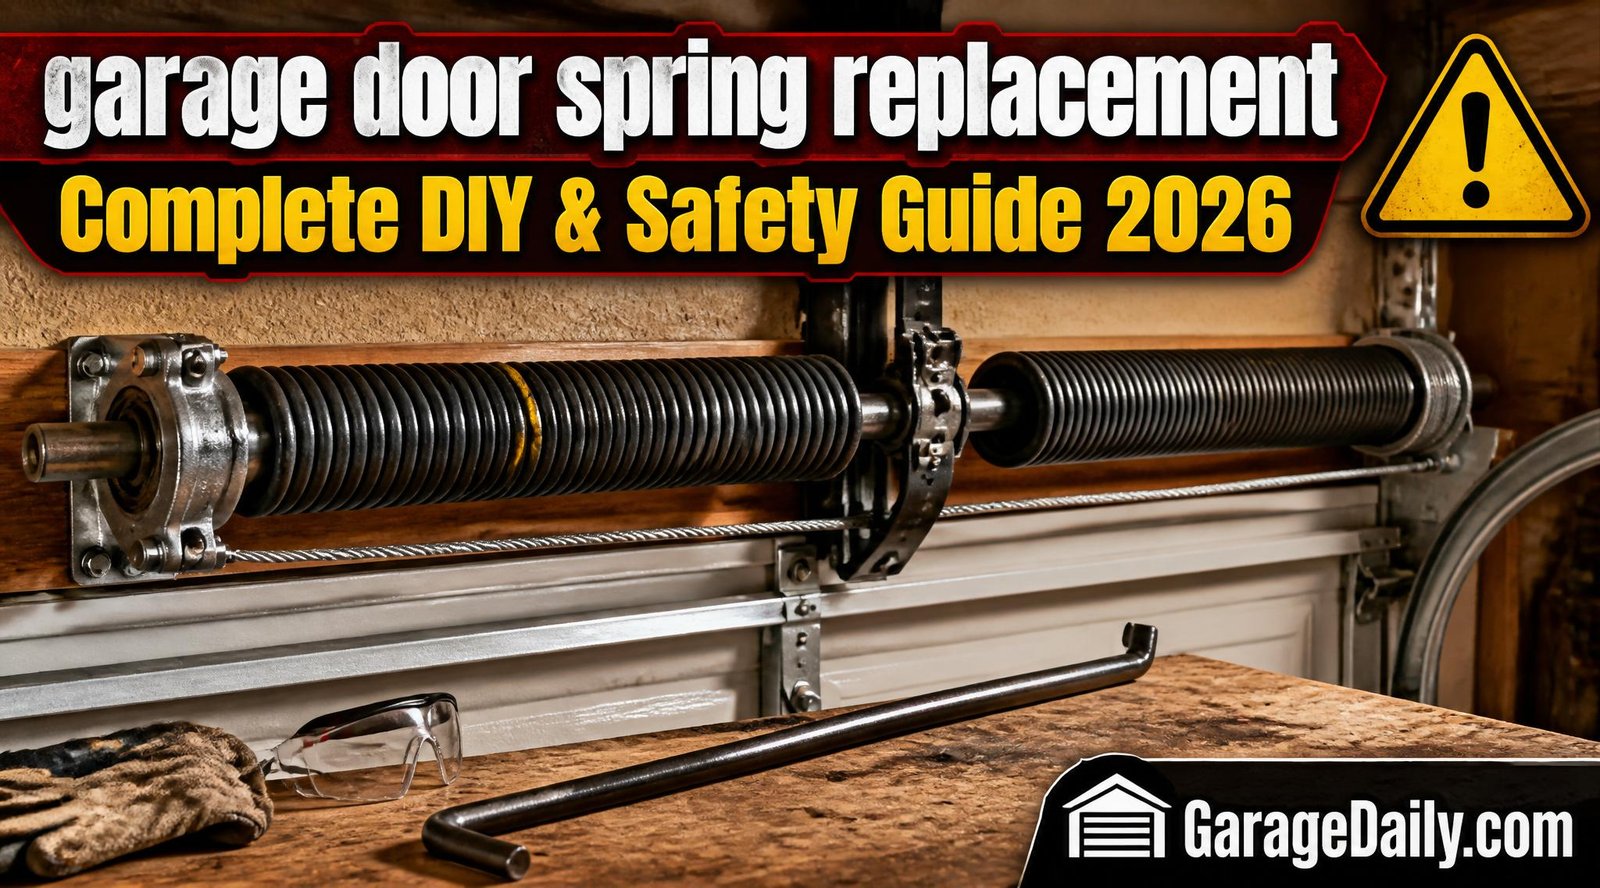
Torsion springs are mounted horizontally on a metal shaft directly above the garage door opening, typically positioned centrally above the door track. They work by twisting (torque) rather than stretching — the spring winds tighter as the door closes, storing energy, and unwinds as the door opens, releasing that energy to assist lifting.
Visual identification: A single thick spring (or sometimes two) mounted on a shaft running horizontally above the door, usually with cable drums on either end.
Risk level: Extremely high. Torsion springs store far more energy than extension springs and require specialized winding bars to safely wind and unwind. The vast majority of garage door spring injuries and fatalities involve torsion springs.
Most common in: Modern garage door installations, particularly anything installed in the last 15-20 years, and virtually all heavier, insulated doors.
Extension Springs
Extension springs are mounted horizontally along the upper tracks on either side of the garage door, running parallel to the horizontal door tracks. They work by stretching and contracting — extending as the door closes and contracting as the door opens, pulling the door upward via a pulley and cable system.
Visual identification: Two long springs running along the horizontal tracks above the door, one on each side, often visible alongside pulleys and cables.
Risk level: High, though somewhat more manageable than torsion springs for an experienced DIYer, since they are not wound under torque and the tension can be more gradually released. Safety cables running through the center of each spring are a critical safety feature that must always be present and properly installed.
Most common in: Older garage door installations and some lighter, single-layer doors.
How to Identify Your Spring Type Quickly
Look directly above your closed garage door:
- If you see a single horizontal shaft with springs mounted on it positioned centrally, you have a torsion spring system.
- If you see two springs running along the upper horizontal tracks on either side, parallel to the ceiling, you have an extension spring system.
This distinction matters enormously for safety, tools required, and whether DIY replacement is advisable at all.
Signs Your Garage Door Spring Is Failing or Broken
Catching a failing spring before complete failure can prevent damage to your opener, your door, and potentially prevent injury. Watch for these warning signs:
The door feels unusually heavy. If you disconnect the opener and try to lift the door manually (always test this way, never rely on the opener to diagnose spring issues), a properly functioning door should lift with relatively light effort and stay roughly balanced at any point. A door that feels significantly heavier than normal, or that drops quickly when you let go, indicates a weakening or broken spring.
A loud bang from the garage. This is often the unmistakable sound of a torsion spring breaking. The sound is sudden, sharp, and surprisingly loud — many homeowners describe it as sounding like a gunshot. If you hear this, do not attempt to operate the garage door until you have visually confirmed (from a safe distance) whether a spring has broken.
The door opens unevenly or at an angle. If one side of the door rises faster than the other, or the door appears crooked as it moves, one spring may have failed while the other (in a two-spring system) is still functioning.
Visible gaps in the spring coils. A torsion spring with a visible gap in its coils, where the metal appears separated, has broken and needs replacement.
The door won’t open more than a few inches. Modern garage door openers have safety sensors that detect excessive resistance and will stop the door rather than force it against a broken spring. This is a built-in safety feature, not a malfunction of the opener itself.
Frayed or visibly stretched cables. On extension spring systems particularly, cables that look frayed, kinked, or unevenly stretched often indicate the springs are reaching end of life.
Age of the springs. Most garage door springs are rated for 10,000 open-close cycles, which translates to roughly 7-12 years of average residential use (about 3-5 cycles per day). If your springs are original to a door installed more than a decade ago, proactive replacement before failure is a smart investment.
DIY vs. Professional: An Honest Safety Assessment
This is the most important section of this guide, and we want to be direct about it: garage door spring replacement, particularly torsion spring replacement, has a well-documented history of causing severe injuries — including lacerations, broken bones, eye injuries, and in rare but real cases, fatalities — even among people attempting the repair with proper tools.
Why This Repair Is Different From Most DIY Projects
Most home repairs, if done incorrectly, result in a repair that needs to be redone or a part that needs replacing. Garage door torsion spring replacement, if done incorrectly, can result in a spring violently unwinding with enough force to break bones, cause severe lacerations, or launch the winding bar like a projectile.
The energy stored in a wound torsion spring is genuinely comparable to other dangerous stored-energy systems in your home — it is simply less commonly discussed because garage doors are not perceived as dangerous in the way that, say, electrical panels are.
When DIY May Be Reasonable
DIY garage door spring replacement may be reasonable if all of the following are true:
- You are replacing extension springs (lower risk than torsion springs)
- You have researched the exact spring specifications for your specific door (wire size, inside diameter, length) and purchased an exact match
- You have the correct specialized tools, including proper winding bars (never substitute screwdrivers or improvised tools)
- You have someone present to assist and call for help if needed
- You are comfortable following detailed technical instructions precisely
- You have watched professional installation demonstrations and fully understand the tensioning process before beginning
When You Should Hire a Professional
Hire a professional garage door technician if:
- Your door uses torsion springs (the majority of modern installations)
- You have never performed this repair before and have any uncertainty about the process
- You do not have access to proper winding bars and other specialized tools
- Your garage door is unusually heavy (oversized, heavily insulated, or commercial-grade)
- You are not physically able to safely manage the tools and tension involved
The cost comparison genuinely favors professional installation for most homeowners when you account for the risk. Professional garage door spring replacement typically costs between $150 and $350 for both springs (including labor), while a trip to the emergency room for a stored-energy injury can cost thousands of dollars and involve lasting injury. This is one of the few home repairs where we recommend most homeowners strongly consider professional service rather than DIY, regardless of mechanical confidence in other areas.
If you do choose to proceed with DIY replacement, the information below is provided for educational purposes and assumes you have already secured proper tools, replacement parts matched to your exact door specifications, and a thorough understanding of the process.
Tools and Materials Needed for Spring Replacement
If you have assessed the risks above and are equipped to proceed (most appropriate for extension spring replacement), here is what you will need.
For Torsion Spring Replacement (Professional Tools Strongly Recommended)
- Properly sized winding bars (typically 1/2-inch steel rods, sold specifically for this purpose — never substitute)
- Vice grips or locking pliers
- Adjustable wrench or socket set
- Safety glasses (mandatory, no exceptions)
- Heavy work gloves
- Ladder (sturdy, properly positioned)
- New torsion springs matched exactly to your door’s specifications
- Winding cone replacement (if old ones show wear)
For Extension Spring Replacement
- Pliers
- Adjustable wrench
- C-clamps or locking pliers (to secure the door in the open position)
- Safety glasses
- Work gloves
- New extension springs matched to your door’s weight rating
- Replacement safety cables (if not already present — these should never be skipped)
Determining the Correct Spring Specifications
Getting the exact correct spring specification is critical — an incorrectly sized spring will fail to properly counterbalance your door, causing premature wear on your opener, uneven door movement, or repeat spring failure.
For torsion springs, you need: wire diameter, inside diameter, and length, plus the wind direction (left-wind or right-wind, as torsion systems typically use one of each).
For extension springs, you need: the spring’s weight rating, which should match your door’s total weight (often stamped on the door itself or available from the manufacturer).
Many manufacturers stamp spring specifications directly on the spring coils, or you can find your door model’s specifications through the manufacturer’s documentation or by consulting with a garage door parts supplier who can identify the correct spring based on your door’s dimensions and weight.
Step-by-Step: Extension Spring Replacement
This process applies to the lower-risk extension spring system. Even still, proceed carefully and never skip safety steps.
Step 1: Disconnect Power and Secure the Door
Unplug or disconnect your garage door opener completely. With the door fully open, secure it firmly in place using C-clamps on the tracks below the rollers on both sides, preventing the door from suddenly dropping during the repair.
Step 2: Release Tension on the Old Spring
With the door open (and the spring therefore at its least tensioned state), carefully unhook the old spring from its mounting bracket and from the pulley cable system. Extension springs in the open position hold significantly less tension than when the door is closed, which is part of why this system carries somewhat lower risk — but caution and safety glasses remain essential.
Step 3: Remove the Old Spring and Inspect Components
Remove the old spring completely. While it is out, inspect the pulleys, cables, and mounting brackets for wear, rust, or damage. Replacing worn pulleys or fraying cables at the same time saves you from a repeat repair soon after.
Step 4: Install the New Spring
Attach the new spring to the mounting bracket, then connect it to the pulley and cable system, following the same routing as the original spring. Ensure the safety cable runs through the center of the spring completely — this cable is what contains the spring if it ever fails again in the future, and it is not optional.
Step 5: Repeat on the Opposite Side
Always replace both extension springs at the same time, even if only one has failed. Springs age and wear together, and replacing only one creates an imbalance that causes uneven door movement and accelerates failure of the remaining old spring.
Step 6: Remove Clamps and Test
Remove the C-clamps, reconnect the opener, and test the door through several full open-close cycles, watching carefully for smooth, even movement on both sides.
Step-by-Step: Torsion Spring Replacement (Professional-Level Overview)
We are including this overview for educational understanding of the process, but want to reiterate: this repair carries serious injury risk and is the repair we most strongly recommend leaving to licensed professionals.
Step 1: Full Power Disconnection and Door Securing
Disconnect the opener completely. Close the garage door fully (torsion springs are wound to maximum tension when the door is closed) and clamp the door securely to the track to prevent any movement.
Step 2: Mark the Torsion Shaft
Before loosening anything, mark the position of the winding cone relative to the torsion shaft with a permanent marker or piece of tape. This reference point helps ensure the new spring is wound to the correct number of turns.
Step 3: Insert Winding Bars and Release Set Screws
Insert a properly sized winding bar fully into one of the winding cone holes, ensuring it is seated completely. With the bar firmly held and braced against your body, loosen the set screws holding the winding cone to the shaft — this is the single most dangerous moment in the entire process, as the full tension of the spring is now held only by your grip on the winding bar.
Step 4: Unwind the Spring Fully and Carefully
Using a second winding bar inserted into the next hole as you remove the first, slowly unwind the spring one quarter-turn at a time, alternating bars and maintaining constant control. Never allow the bar to slip or move quickly — this controlled, deliberate unwinding is what professional technicians train extensively to execute safely.
Step 5: Remove the Old Spring
Once fully unwound and tension-free, remove the old spring from the shaft.
Step 6: Install and Wind the New Spring
Slide the new spring onto the shaft in the correct position, then — using the same alternating winding bar technique in reverse — wind the new spring to the manufacturer’s specified number of turns (typically 7 to 10 full turns depending on door height and spring specification).
Step 7: Secure Set Screws and Test
Once properly wound, tighten the set screws fully, remove the winding bars, release the door clamps, and test the door through several cycles, watching for smooth, balanced movement.
This entire torsion process, when performed by trained professionals, typically takes 45 minutes to an hour for both springs. The brevity of the professional process does not reflect ease — it reflects the value of training, experience, and proper equipment, which is exactly why this is the repair category where professional service offers the clearest value for most homeowners.
Garage Door Spring Replacement Cost Breakdown
Understanding realistic costs helps you make an informed decision between DIY and professional service.
| Option | Cost Range | What’s Included |
|---|---|---|
| DIY Extension Springs (parts only) | $20–$60 | Pair of springs, basic hardware |
| DIY Torsion Springs (parts only) | $40–$100 | Pair of springs, winding cones if needed |
| Professional Extension Spring Replacement | $100–$250 | Parts, labor, inspection, warranty |
| Professional Torsion Spring Replacement | $150–$350 | Parts, labor, inspection, warranty |
| Emergency/Same-Day Service | $200–$450+ | Includes after-hours or urgent response premium |
Professional pricing typically includes a service call fee, the spring parts themselves, labor, and often a warranty on both parts and workmanship — protection that DIY replacement does not offer. Many professional installers also inspect and adjust related components (cables, pulleys, rollers, opener calibration) during the same visit, addressing related wear issues before they cause a separate failure.
How to Extend the Life of Your Garage Door Springs
Once you have working springs — whether newly replaced or original — a few maintenance habits significantly extend their lifespan.
Lubricate annually. Apply a silicone-based or lithium-based garage door lubricant (never standard oil or WD-40, which attracts dust and grime) to the springs, hinges, and rollers once or twice a year. This reduces friction and metal fatigue significantly.
Keep the door balanced. A door that is properly balanced (lifts easily and stays in place at any point when disconnected from the opener) puts even, predictable stress on springs. An unbalanced door — often caused by track misalignment or one weakened spring — accelerates wear on the remaining components.
Avoid manual force on a malfunctioning door. If a door feels unusually heavy or resistant, stop and investigate rather than forcing it open or relying on the opener motor to push through resistance. This protects both your springs and your opener.
Maintain consistent temperature exposure where possible. Extreme temperature swings cause metal expansion and contraction that accelerates spring fatigue over time. If your garage experiences extreme heat or cold, our guide on how to insulate a garage covers practical steps that also help moderate the environment your door hardware operates in.
Schedule periodic professional inspections. An annual inspection (often available as a low-cost add-on when scheduling other garage services) can catch early spring wear, cable fraying, or alignment issues well before they result in sudden failure.
What to Do Immediately After a Spring Breaks
If you experience a sudden spring failure, follow these steps for safety and to prevent further damage:
Do not attempt to open or close the door using the opener. Forcing the opener to lift the door against a broken spring can burn out the motor and, in some cases, cause the door to fall suddenly if the opener’s resistance gives way.
Keep people and pets away from the door area. A door with a broken spring is unpredictable and may shift or drop unexpectedly.
If the door is open, leave it open and secure it. Use clamps on the tracks if you have them and know how to apply them safely; otherwise, simply keep the area clear and avoid disturbing the door.
If the door is closed, leave it closed. Do not attempt to manually force it open.
Visually inspect from a safe distance. Look for the obvious signs described earlier — a visible gap in a torsion spring, an unevenly hanging door, or a detached extension spring.
Schedule repair promptly. A broken spring is not a problem that improves with time, and continuing to use the opener against a failed spring risks additional damage to your opener motor and door hardware.
Garage Door Spring Safety: Critical Rules to Never Break
If you take away only a handful of points from this guide, make them these:
Never remove a torsion spring without proper winding bars. Improvised tools (screwdrivers, regular pry bars) are simply not strong enough or properly designed to safely control the release of tension, and their failure under load is a leading cause of injury.
Never stand directly in front of the spring while winding or unwinding. Position your body to the side, out of the direct line of force if a bar were to slip.
Always wear safety glasses. Eye injuries from spring-related incidents are common and entirely preventable with this single piece of equipment.
Never attempt this repair alone. Have someone present who can call for emergency help if something goes wrong.
Never bypass or remove safety cables on extension springs. These cables exist specifically to contain a spring if it breaks during operation, preventing it from becoming a dangerous projectile.
When in doubt, call a professional. There is no shame in recognizing that a repair exceeds your comfort level or equipment — and significant wisdom in it. For broader guidance on identifying which garage repairs are appropriate for DIY versus professional service, our garage safety guide covers 20 essential safety principles that apply across nearly every garage maintenance task.
Frequently Asked Questions About Garage Door Spring Replacement
Q: How long do garage door springs typically last? Most residential garage door springs are rated for approximately 10,000 cycles (one cycle being one full open and close). For an average household opening the door 3-5 times daily, this translates to roughly 7-12 years of service life before replacement becomes necessary.
Q: Can I replace just one spring, or do I need to replace both? Always replace both springs together, even if only one has failed. Springs experience essentially the same number of cycles and wear at similar rates. Replacing only the failed spring leaves a mismatched, aging spring on the other side that is likely to fail again soon, requiring a second repair visit.
Q: Is it cheaper to replace garage door springs myself? The parts themselves are significantly cheaper for DIY ($20-$100 versus $150-$350 professionally), but this cost comparison does not account for the genuine injury risk involved, particularly with torsion springs, or the value of professional warranty coverage. For torsion springs specifically, most homeowners find that the cost savings do not justify the risk.
Q: How do I know if I need a new spring or just adjustment? A spring with a visible gap in its coils, or one that has audibly broken (the characteristic loud bang), requires full replacement. A spring that is simply weakening over time (gradual increase in door weight when lifting manually) may sometimes be adjusted by a professional, but in most cases, replacement is the more reliable long-term solution.
Q: What happens if I ignore a broken garage door spring? Continuing to operate the door via the opener with a broken spring places excessive strain on the opener motor, often leading to motor burnout, which then requires an additional, often more expensive, opener replacement. It also creates an ongoing safety hazard, as the door’s movement becomes unpredictable.
Q: Can a garage door spring break without warning? While catastrophic failure does happen suddenly, most springs show warning signs in the weeks or months prior — gradually increasing resistance when opening manually, visible surface rust or wear, or minor unevenness in door movement. Periodic visual inspection can often catch these signs before a sudden failure occurs.
Final Thoughts: Respecting the Power Stored in Your Garage Door Springs
Garage door spring replacement sits in a unique category among home repairs: it is mechanically simple to understand but genuinely dangerous to execute without proper training, tools, and respect for the forces involved. The energy stored in a properly wound torsion spring is not a minor consideration — it is the same physical principle that makes your garage door able to lift hundreds of pounds with a gentle push, and that same energy, released uncontrolled, has caused serious harm to capable, careful people.
If you have assessed your situation honestly and have the correct tools, knowledge, and an extension spring system specifically, careful DIY replacement is achievable. For torsion springs, or for any situation where uncertainty exists, the modest cost of professional service is a wise investment in both the longevity of your garage door system and, more importantly, your own safety.
Whatever path you choose, the goal remains the same: a garage door that opens smoothly, closes safely, and protects everyone who passes through it.
Continue mastering your garage with these related guides:
- Best Garage Door Openers: Complete Buying Guide & Installation Tips
- Garage Safety Guide: 20 Essential Tips to Keep Your Garage Safe
- How to Organize Your Garage: The Ultimate Step-by-Step Guide
- The Complete Garage Lighting Guide: Best Lights, Setup Tips & Ideas
- How to Insulate a Garage: The Complete Step-by-Step Guide
- Garage Floor Epoxy Coating: The Complete DIY Guide
- How to Set Up a Garage Workshop: The Complete Organization Guide