How to Set Up a Garage Workshop: The Complete DIY Guide (2026)
By Danial Marquez | Maintenance | Updated July 2026
For millions of American homeowners, the garage workshop is the one room in the house that belongs entirely to them. It’s where projects get built, cars get fixed, furniture gets made, and problems get solved. A well-designed garage workshop isn’t just a collection of tools — it’s a system where every square foot is deliberate, every outlet is placed exactly where you need it, and every project you take on starts with a space that makes the work easier rather than harder.
The difference between a garage that happens to have some tools in it and an actual workshop comes down to planning. A workshop that works is designed — for the work you do, the tools you own, the space you have, and the safety protocols that keep you using it for decades. This guide walks through every element of that design process, from the foundational improvements to layout, workbench, storage, power, lighting, and safety — covering both the one-car garage workshop on a tight footprint and the two-car setup with room for serious equipment.
If you’ve already set up a home gym or converted space to a living area using our conversion guides, the workshop is the third and final piece of the garage conversion trilogy — and in many ways the most personal, because it’s built around your specific work, your specific tools, and the projects only you will make in it.
Step 1: Start With the Foundation — Before Any Tools Go In
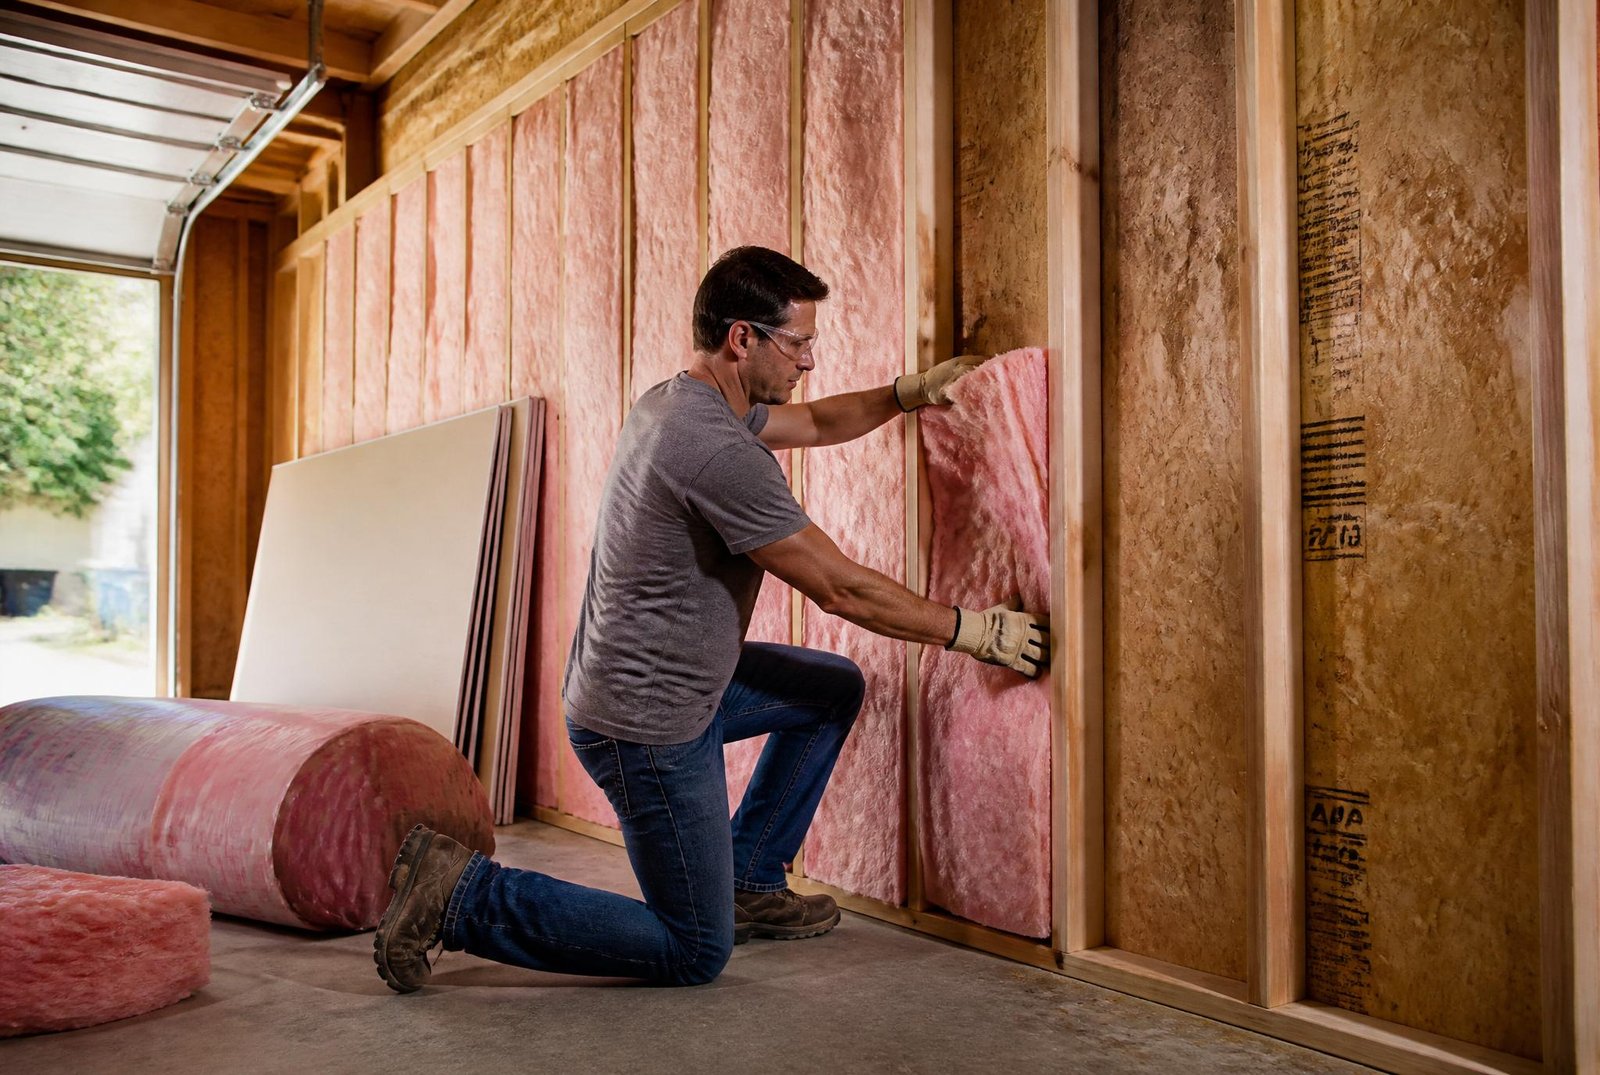
The single most common mistake in garage workshop setup is skipping the foundational improvements and going straight to arranging tools. A workshop built on top of an uninsulated, unventilated, poorly lit concrete slab will always be a compromise — uncomfortable in summer, freezing in winter, and hard on both tools and the person using them.
Insulation first. An uninsulated garage is genuinely hostile to precision woodworking and metalworking. Wood absorbs and releases moisture with temperature swings, which means boards that are flat in July bow in February. Finishes that cure perfectly in autumn may bubble or blush in summer humidity. And beyond material science, working in a space that’s 100°F in July or 25°F in January simply makes every project harder. If your garage walls and ceiling aren’t insulated, completing our guide on how to insulate a garage before setting up the workshop saves you from fighting your environment every time you work. Mineral wool insulation is particularly recommended for workshop garages because it also provides meaningful acoustic separation — important when running power tools.
Ventilation is non-negotiable. Workshop air is laden with wood dust, paint fumes, solvent vapors, and metal particles. A garage without mechanical ventilation traps all of these. At minimum, install an exhaust fan sized to your garage’s volume (see our complete garage ventilation guide for sizing formulas) and place a fresh air intake on the opposite wall. For a painting or finishing area, a dedicated spray booth exhaust with filtered intake is the professional standard. The ventilation system you install for the workshop also handles the CO and moisture risks covered in the safety guide — it does multiple jobs simultaneously.
Floor treatment. Concrete dust is the enemy of precision tools — it gets into bearings, coats surfaces, and creates a slippery layer underfoot. An epoxy-coated floor, as covered in our complete guide to epoxy coating a garage floor, solves both problems: it seals the concrete completely, dramatically reduces dust, cleans up easily after sawdust or oil spills, and is significantly easier on the feet and knees during long work sessions than bare concrete. Apply the floor coating before workbenches and tool stands go in — it’s far easier to coat an empty garage than to work around installed equipment.
Power planning. This is the step most homeowners skip and then regret. Before deciding on a layout, inventory every power tool you own or plan to own and note its voltage and amperage requirements. Table saws, dust collectors, air compressors, and spray systems can easily require 20-amp 120V or 240V dedicated circuits. Running out of outlets — or tripping a shared breaker every time you run the table saw and shop vac simultaneously — is one of the most frustrating constraints in an otherwise good workshop. Consult with an electrician early. Adding circuits during the workshop build-out is far less expensive than cutting into finished walls later, and it’s a natural companion to any EV charger circuit work covered in our complete EV charging guide.
Step 2: Plan Your Layout Before Moving a Single Tool
Layout is where workshop design either succeeds or fails. The goal is a space where work flows naturally from one station to the next, where you’re never fighting the layout to make a cut or move a workpiece, and where everything you reach for regularly is within arm’s reach of where you use it.
Draw it on paper first. Measure your garage carefully — length, width, ceiling height, door locations, window locations, existing outlet positions, and any fixed features like beams or posts. Draw it to scale on graph paper or use a free tool like SketchUp or RoomSketcher. Then sketch your major equipment and workbench within the space before committing to anything.
Zone your workshop. Professional shops — even small ones — are divided into functional zones that group related activities and equipment together:
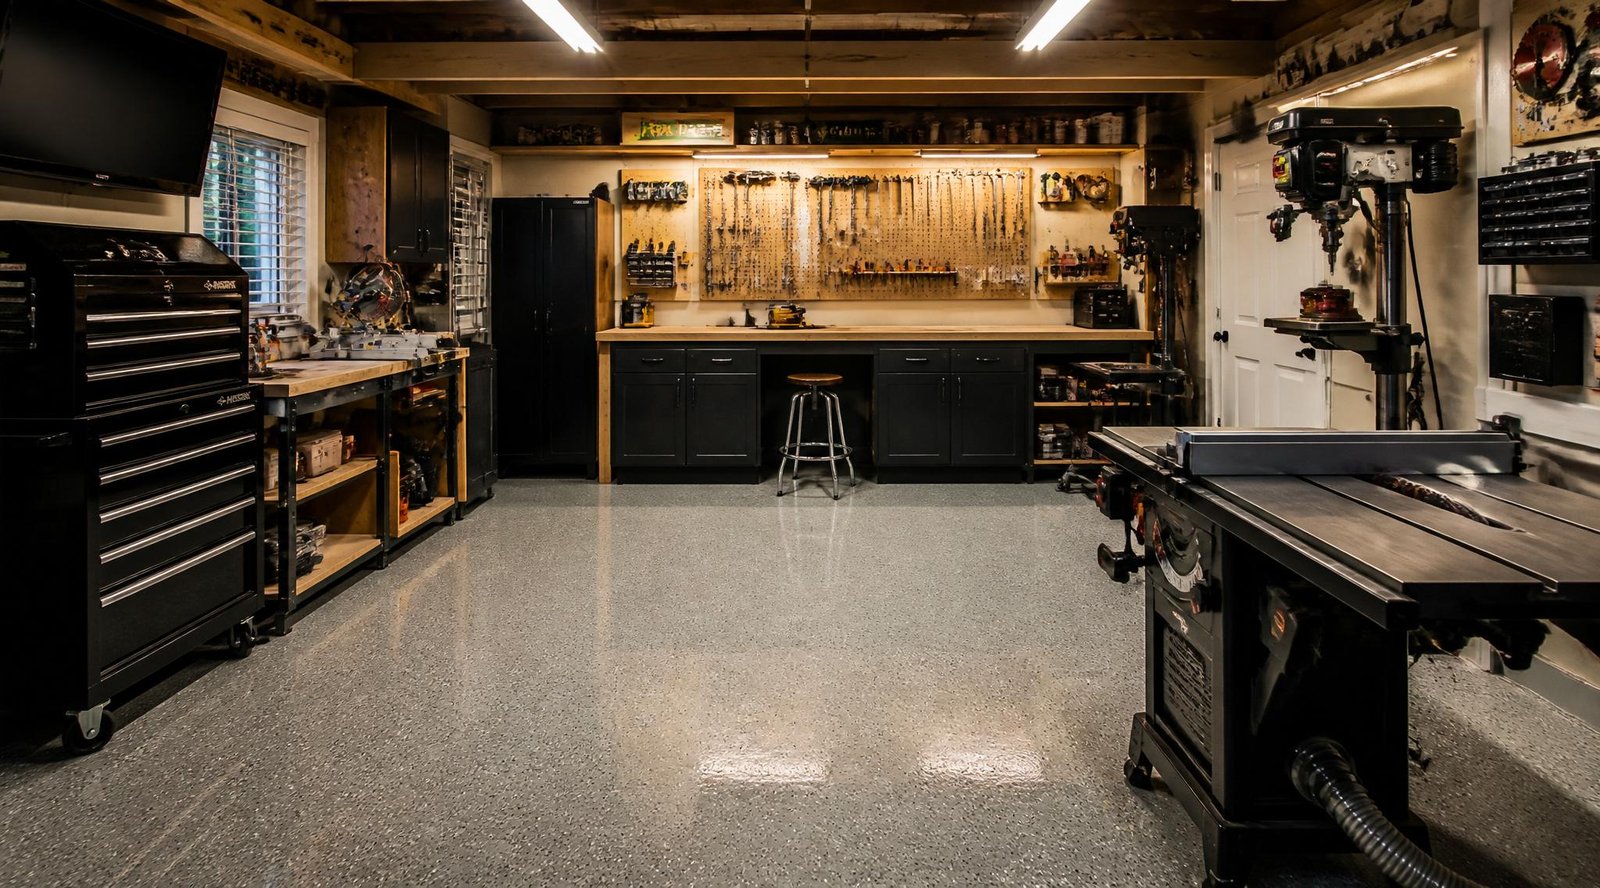
The workbench zone is the heart of the shop — a solid, level bench at working height with storage below and a tool board above. This is where hand tool work, assembly, layout, and measuring happen. Position it near natural or task lighting and within easy reach of the most frequently used outlets.
The stationary power tool zone contains large floor-standing equipment — table saw, band saw, drill press, lathe, jointer, planer. These machines need clearance on all four sides for infeed and outfeed of long boards. The table saw especially needs at least 8 feet of clear space in front, behind, and to the left for ripping full sheets of plywood.
The finishing zone is where sanding, painting, and staining happen. This zone needs dedicated ventilation (separate from general shop exhaust if possible), good lighting from multiple angles to catch drips and missed areas, and ideally some separation from sawdust-generating tools. Sawdust and wet finishes are a quality-ruining combination.
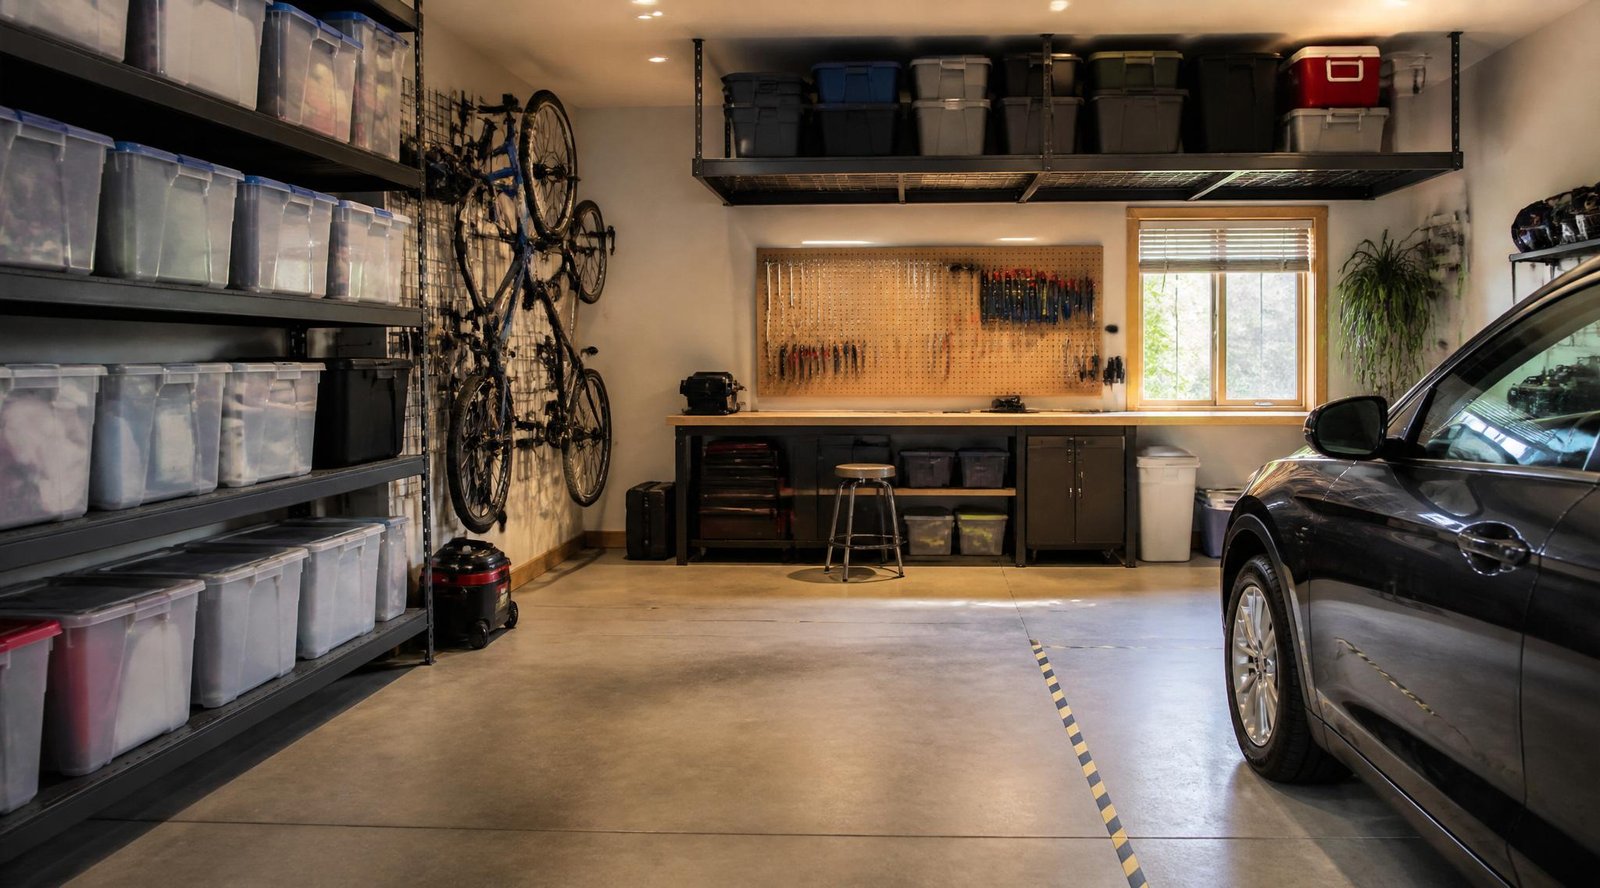
The storage zone holds lumber, hardware, hand tools, and supplies. Vertical lumber storage racks and wall-mounted hardware organizers keep the floor clear and materials accessible.
Key layout principles:
Place the table saw near the center of the shop (if space allows) so it has outfeed room in all directions. Face it so that ripped boards feed parallel to the longest wall rather than toward a wall or door.
Position the workbench against the best-lit wall — typically the wall with a window, if one exists, or the wall directly under a bright LED fixture run.
Keep finishing supplies and flammable solvents away from heat sources, sparks, and the main power tool zone. A metal cabinet for flammable storage is worth the investment.
Plan traffic paths between zones so you can carry a long board from lumber storage through the cutting zone to the workbench without navigating around equipment.
For small one-car garages: The French Cleat wall system is the single best tool for maximizing a small shop’s utility. A wall of French cleats (horizontal strips of wood cut at 45 degrees, mounted across the entire wall) lets you hang and rearrange any tool, jig, bin, or accessory at any height without drilling new holes. Combined with a fold-down workbench on one wall (drops flat against the wall when not in use, freeing floor space), a small garage can function as a full workshop while still accommodating a vehicle.
Step 3: Build or Choose Your Workbench
The workbench is the most-used surface in any workshop, and it’s worth getting right. A cheap, wobbly bench transmits vibration to everything on it, flexes during hand-tool work, and makes precision tasks frustratingly difficult. A properly built bench is rock-solid, flat, and built to survive decades of use.
Workbench height. The ideal bench height is approximately at the level of your hip bone — usually 34 to 36 inches for most people. This height is right for hand planing, chiseling, and assembly work. For metalwork and machining, a slightly higher bench (36–38 inches) reduces back strain. If you’re tall or short, adjust accordingly — an inch off in the wrong direction means back pain after every long session.
Workbench depth and length. A depth of 24 inches is the practical minimum; 30 inches gives you more useful surface area without making it hard to reach the back. Length is largely determined by your garage space, but a bench shorter than 6 feet limits how you can work with longer pieces. An 8-foot bench is ideal for most shops.
Workbench materials:
Solid wood workbench — the traditional choice. A bench built from construction-grade Douglas fir or hard maple is heavy, flat, and dead-solid. The weight (often 200–400 lbs) is a feature — it doesn’t move during heavy work. You can build a solid-wood workbench from scratch in a weekend using construction lumber for under $200 in materials, which is far superior to most entry-level commercial benches.
Torsion box workbench — engineered panels (MDF or plywood skins over a honeycomb core) produce an extremely flat, lightweight surface. Common in finish and assembly work where flatness matters more than impact resistance.
Commercial workbenches — steel-frame benches with wood or steel tops are widely available at $150–$600. Convenient but often not as flat, heavy, or customizable as a shop-built bench. Adequate for general use; not ideal for hand-tool woodworking.
Essential bench features:
Vise: A bench vise is not optional — it’s the bench’s most-used feature. A face vise on the front-left corner of the bench and an end vise on the right end give you four clamping configurations. Leg vises (a traditional wooden vise mounted at the leg) are the choice of serious hand-tool woodworkers. Cast-iron quick-release face vises are the most practical choice for general shops.
Dog holes: Rows of holes (typically 3/4 inch diameter) drilled through the benchtop at regular intervals allow bench dogs — wooden or metal pegs — to hold workpieces flat against the bench surface. Essential for hand planing.
Storage below: Drawers or cabinet doors below the bench keep frequently used hand tools and hardware within immediate reach without cluttering the bench surface. Even simple open shelves below are better than wasted space.
Step 4: Tool Storage — A Place for Everything
The difference between a workshop and a cluttered garage with tools in it is almost entirely storage. When every tool has a specific, accessible place, you spend time working instead of searching. When tools are stacked on any available surface, projects slow down and tools get damaged.
Pegboard and French Cleat walls. Mounting a full pegboard panel or French cleat wall directly above the workbench is the most efficient use of vertical space in a small shop. Hand tools — hammers, chisels, squares, levels, planes, screwdrivers — all hang visibly and accessibly within reach of the bench. The visual inventory also makes it immediately obvious when a tool is missing or out of place.
Wall-mounted storage shelves. For heavier items — power tools, finishing supplies, hardware bins — fixed shelves mounted on standard shelf brackets or adjustable wall-track systems work better than pegboard. Position them above head height on walls where they won’t interfere with workflow, and below eye level where you need to read labels on hardware bins.
Mobile tool cabinets. A rolling tool chest (the kind with drawers used in automotive shops) is one of the most useful investments in a garage workshop. It keeps small tools organized, is lockable, and can be moved to wherever the work is happening. High-quality models from Snap-on or Craftsman professional line last a lifetime. Budget-friendly versions from Harbor Freight are adequate for hobbyist workshops.
Lumber and sheet goods storage. Proper lumber storage prevents warping and maximizes floor space. A wall-mounted horizontal lumber rack (steel pins set into the wall at regular intervals, boards resting across them) stores long boards vertically against the wall using minimal floor space. For sheet goods (plywood, MDF), a rolling cart that holds sheets vertically in slots is the most practical solution for a garage shop — sheets lean at a slight angle, can be pulled out one at a time, and the cart rolls to wherever the table saw is.
Hardware organization. Small parts — screws, bolts, nails, sandpaper, blades — multiply faster than any other category in a shop. Stackable plastic bin systems (like Stanley FatMax or Akro-Mils) mounted on a wall or shelf keep hardware sorted and visible. Label every bin. It costs 10 minutes and saves hours of searching over the life of the shop.
For a comprehensive look at maximizing wall storage specifically, including shelf systems, wall-mounted solutions, and space planning, our ultimate garage organization guide covers the full range of storage approaches that apply directly to a workshop context — especially in garages that serve double duty as both a workshop and a storage space.
Step 5: Lighting — See What You’re Doing
Lighting is one of the most neglected elements of garage workshop setup, and inadequate lighting causes errors, fatigue, and accidents that would simply not happen in a well-lit space. The standard single fluorescent fixture that came with the garage is almost never sufficient for precision work.
Overall ambient lighting. LED shop lights are the current standard — they’re bright, energy efficient, long-lasting, and available in configurations that mount flush to the ceiling or hang on chains. A 4-foot LED shop light (5,000 lumens) provides good coverage for roughly a 10×10 foot area. A two-car garage workshop typically needs 4–6 of these distributed evenly across the ceiling for consistent general illumination. Aim for no shadows across the main work areas.
Task lighting at the workbench. Supplemental lighting directly above or beside the workbench — either an adjustable articulating arm lamp or a dedicated undercabinet LED strip — eliminates the shadows that overhead fixtures cast on close work. A bright, direct task light is the difference between squinting at a line and seeing it clearly.
Lights at machines. Many stationary tools benefit from a dedicated work light — a flexible neck LED lamp clamped to the drill press, a light strip mounted above the band saw blade, or a magnetic LED positioned to illuminate the blade line on the table saw. These are inexpensive additions that make an immediate difference in cut quality and safety.
Color temperature. Choose LED fixtures with a color temperature of 5,000K (daylight) for the workshop. Warm-toned LEDs (2,700–3,000K) make it difficult to accurately assess paint colors and stain tones. The cool, white light of 5,000K LEDs shows wood grain, finish quality, and surface defects accurately.
Step 6: Electrical — Power Where You Need It
Every workshop’s most frustrating limitation is almost always power — not enough outlets, wrong location, wrong voltage, or shared circuits that trip under tool load. Planning electrical before the workshop is set up (or accepting the cost of adding it early) pays for itself within the first year.
Circuit planning for common workshop needs:
General outlets, 15–20A, 120V: Multiple circuits running 20-amp outlets spaced every 4–6 feet along the workbench wall and around the perimeter keeps extension cords off the floor (where they become trip hazards) and ensures you’re never more than a couple of steps from a plug.
Table saw circuit, 15–20A, 120V: Most contractor-grade table saws run on 120V, 15A. Cabinet saws and larger contractor saws often require a 240V, 20A dedicated circuit. Know your saw’s requirements before setting the circuit.
240V circuits for large equipment: Air compressors over 2 HP, large dust collectors, some lathes, planers, and jointers, and any 240V finishing equipment need dedicated 240V circuits. Plan these during the electrical rough-in — adding them later means cutting into finished walls.
Dust collector circuit: Ideally on its own dedicated circuit so that running the dust collector doesn’t share load with the machine it’s serving.
Outlets at eye height over the workbench: Standard outlets at floor level require extension cords to reach bench-height work. Install a strip of 20-amp outlets at approximately bench height on the wall directly behind the workbench.
Step 7: Dust Collection — The Invisible Priority
Woodworking generates extraordinary amounts of airborne dust and surface debris, and managing it is both a health necessity and a shop cleanliness issue. Fine wood dust (particularly from hardwoods, MDF, and treated lumber) is classified as a respiratory hazard with long-term exposure; a properly set-up dust collection system is one of the most important investments in a serious woodshop.
Single-machine collection: At minimum, every stationary tool should have a dust port connected to either a shop vacuum or a small dust collector. This captures the majority of dust at the source before it becomes airborne.
Centralized dust collection: A 1.5–2 HP dust collector unit with 4-inch main line ducting run to each stationary machine — table saw, jointer, planer, sander — keeps the shop remarkably clean with minimal ongoing management. Gates at each machine allow you to isolate individual machines, and the collector runs to a central bag or cyclone separator.
Ambient air filtration: Fine dust that escapes machine collection becomes suspended in the shop air and settles slowly over hours. A ceiling-mounted ambient air filtration unit (essentially a large, quiet box filter that recirculates shop air through progressively finer filters) dramatically reduces airborne fine dust. Run it during and for 30 minutes after any sanding or cutting session.
Respiratory protection: Regardless of how good the dust collection is, always wear a properly fitted respirator during sanding, finishing, and any work with MDF (which generates especially fine, hazardous dust). The correct respirator for woodworking is rated at minimum N95 for particulates; an N100 or P100 half-face respirator is better for extended sessions.
Step 8: Safety — Built Into the Workshop, Not Added As an Afterthought
A safe workshop isn’t one with rules posted on the wall — it’s one designed so that doing the right thing is the easy thing. Safety features built into the layout and setup eliminate most accidents before they can happen.
Fire safety. Keep a 5-lb ABC dry chemical fire extinguisher mounted within reach of the exit, not near the most likely fire source (where you couldn’t reach it in an emergency). Finishing areas with solvent-based products need a separate metal flammable storage cabinet — $50–$150, one of the best safety investments in any shop. Never leave rags soaked in oil-based finish crumpled in a pile — they can spontaneously combust; hang them flat to dry or store in a sealed metal container with water.
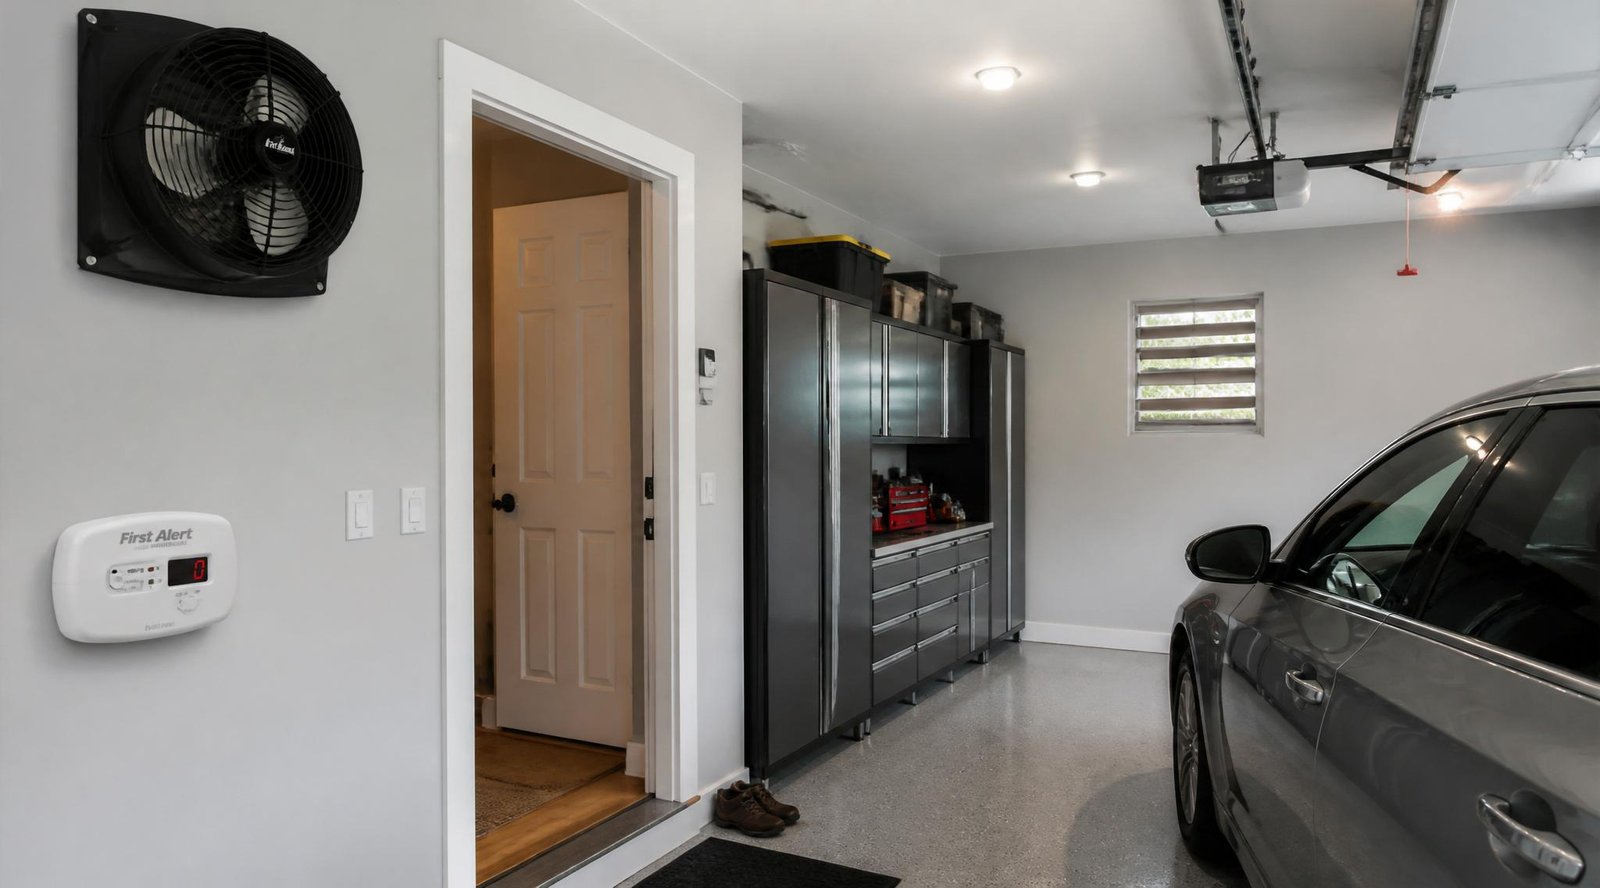
Electrical safety. All 120V workshop circuits in a garage should be GFCI-protected per the 2026 NEC requirements. GFCI outlets detect ground faults and cut power within milliseconds — essential in a garage environment where tools may contact water from a leaky roof, condensation, or cleaning.
Eye and hearing protection. Mount a dedicated hook or shelf at the workshop entry for safety glasses and hearing protection. If they’re the first things you touch on the way in and the last things you put back on the way out, they get used. Eye and hearing protection stored in a drawer gets skipped.
First aid kit. Mount a well-stocked first aid kit (including sterile pads for cuts, burn treatment, and eye wash) somewhere visible and accessible in the workshop. Restock it after any use.
CO detector. As detailed in our complete garage ventilation and safety guide, an attached garage workshop — particularly one where you may run any gasoline-powered equipment, a gas heater, or where the family car also parks — needs a functioning CO detector. Mount it at the doorway to the house where it monitors the air moving between the garage and the living space.
Machine-specific safety:
Table saw: Always use the blade guard when it can be used safely. Never reach behind the blade. Use a riving knife or splitter on every cut to prevent kickback — the single most dangerous thing a table saw does.
Router and router table: Hearing protection is mandatory — routers are among the loudest shop tools in common use. Always climb-cut only when necessary; conventional direction routing for almost all operations.
Drill press: Always clamp the workpiece. A piece spinning free on a drill press bit can cause a serious hand injury in a fraction of a second.
Step 9: Climate Control for Year-Round Use
A workshop that’s only comfortable 6 months of the year is a workshop that gets used 6 months of the year. Climate control transforms the space from seasonal to year-round.
Heating. Forced-air propane or natural gas shop heaters are the most common and effective solution for garage workshops. A 30,000–60,000 BTU unit heats a two-car garage from freezing to comfortable in 20–30 minutes. Infrared radiant heaters warm objects and people (rather than air) and are particularly effective in poorly insulated shops. Electric resistance heaters work in small well-insulated spaces but are expensive to operate at scale.
Important: gas heaters in an attached garage require adequate combustion air and exhaust ventilation. A unit designed for garage use with proper venting is essential — an unvented propane heater in a closed garage produces CO at dangerous levels. Any gas heater installation in an attached garage should be paired with the CO detector and ventilation improvements described in our ventilation guide.
Cooling. A well-insulated garage (see our insulation guide) with a properly sized exhaust fan handles most summer cooling adequately for a few hours of work. For serious summer use in hot climates, a portable evaporative cooler (swamp cooler) works well in dry climates at low cost; a window AC unit or mini-split handles the job in humid climates where evaporative cooling is ineffective.
Humidity control. Woodworking especially suffers in high-humidity environments — wood absorbs moisture and moves, joints open, and finishes fail. A dehumidifier running in the summer months keeps workshop humidity in the 40–50% range where wood is stable and finishes cure properly.
Garage Workshop on a Budget: The Essentials First Approach
Not every workshop starts fully equipped. If you’re building a workshop on a limited budget, here’s the prioritized order that gives you the most functional space for the least immediate investment:
Phase 1 — Foundation ($300–$800): Adequate lighting (2–4 LED shop lights), one solid workbench (shop-built from construction lumber), GFCI outlets at bench height, a fire extinguisher, and basic PPE (safety glasses, hearing protection, respirator). This phase turns the garage into a usable workspace.
Phase 2 — Storage and Organization ($200–$500): Pegboard above the workbench, wall-mounted lumber rack, French cleat system or adjustable shelving, rolling tool chest. This phase makes the space efficient.
Phase 3 — Dust Collection ($200–$600): Shop vacuum with fine dust filter as the minimum; a 1.5 HP dust collector connected to the table saw and sander if budget allows. This phase protects your health and keeps the shop clean.
Phase 4 — Climate and Power ($500–$2,000+): Heating solution, additional dedicated circuits, dust filtration unit. This phase extends usability to year-round.
The tools themselves — table saw, band saw, drill press, planer — are a parallel investment that happens alongside the phases above based on your specific projects and budget.
The Dual-Use Workshop: Sharing Space With a Vehicle
Many garage workshops need to coexist with one or two cars — the car parks in the space when the shop isn’t in use, and the shop equipment needs to be positioned so it doesn’t get in the way of parking or create damage risk.
The most effective dual-use strategy is to concentrate all fixed shop equipment along one or two walls, leaving the center of the garage open for parking. Rolling equipment — tool chests, workbenches on casters, lumber carts — can be pushed against the wall when cars are inside and rolled to working position when the garage is in workshop mode.
A fold-down workbench (wall-mounted, hinges flat against the wall when not in use) is the ultimate space-saving solution for a single-car garage that also needs to park a car. Combined with a French cleat wall for tool storage and a rolling tool chest, an entire functional shop can be set up and packed away in about 10 minutes.
If the workshop is the priority and the car is secondary, consider parking one car outside and dedicating the full width of the garage to the shop — this is the decision that turns a cramped compromise into a genuinely functional workspace.
Final Thoughts
A garage workshop is never finished — it grows and improves with every project you complete and every limitation you discover in the current setup. The goal of the initial setup isn’t perfection; it’s building a functional, safe foundation that makes your first projects possible and your subsequent improvements obvious.
Start with the infrastructure — insulation, ventilation, floor, power, and lighting. Then build or buy the workbench. Then add storage until everything has a place. Then let the tools and projects you actually pursue guide every upgrade after that.
The garage workshop is the space that makes everything else possible — the furniture for the house, the repairs on the vehicle, the projects for the kids, the things you build instead of buy. Set it up well, and it pays you back for the rest of your life.
For a complete picture of everything your garage can become, pair this guide with our coverage on how to insulate a garage, how to soundproof a garage, garage ventilation and safety, how to epoxy coat a garage floor, and how to organize a garage. Together, they build the complete framework — the workshop is the final piece that makes it all purposeful.
What does your garage workshop look like? Share your setup, your must-have tools, or your biggest space challenges in the comments — and explore our full Maintenance guides for more ways to upgrade your garage in 2026.